Android开发中,很多时候,我们都需要写一大段一大段的代码用来初始化控件,设置监听,一点都不简洁,这个时候,我们可以使一些强大的工具来帮助我们。
简介
AnroidAnnotaions](https://github.com/excilys/androidannotations/wiki)是一款可以快速实现Android开发动态注入的框架,可以帮助我们实现精简的代码,它的目标就是"Fast Android Development.Easy maintatinance”。
特点
- 依赖注入:实现布局、视图、系统服务、资源的注入
- 简化线程模型:以注释方法来完成UiThread和BackgroudThread
- 事件绑定:可以不再使用丑陋的匿名监听器
- REST client:创建客户端接口
- 简单快速:只需要50kb,没有任何性能上的问题
导入
- AnroidStudio在build.gradle文件中添加
1
2
3
4
5
6
7
8
9
10
11
12
13
14
15
16
17
18
19
20
21
22
23
24
25
26
27
28
29
30
31
32
33
34
| //Copy Begin---从这里开始复制----
apply plugin: 'android-apt'//添加使用apt插件
def AAVersion = '3.0.1'//这里设置AA的版本号
buildscript {
repositories {
mavenCentral()
}
dependencies {
//这里设置gradle的版本
classpath 'com.android.tools.build:gradle:0.12.2'
//这里设置apt的版本
classpath 'com.neenbedankt.gradle.plugins:android-apt:1.+'
}
}
repositories {
mavenCentral()
mavenLocal()
}
apt {
arguments {
androidManifestFile variant.processResources.manifestFile
resourcePackageName 'com.houny.androidannotations'//TODO 注意这里要设置当前项目的包名
}
...
dependencies {
compile fileTree(dir: 'libs', include: ['*.jar'])
//Copy Begin-------从这里开始复制--------------
apt "org.androidannotations:androidannotations:$AAVersion"
compile "org.androidannotations:androidannotations-api:$AAVersion"
//Copy End--------一直复制到这里-------------
}
...
|
- Eclipse ADT
下载androidannotations-xxx.jar和androidannotations-api-xxx.jar
分别将api-xxx.jar放入libs目录下,xxx.jar放入compile-libs目录下
然后打开Project|Properties|Java Compiler,选中Enable annontation processing
查看Annontation Process|Factory Path点击Add JARs把xxx.jar添加进来
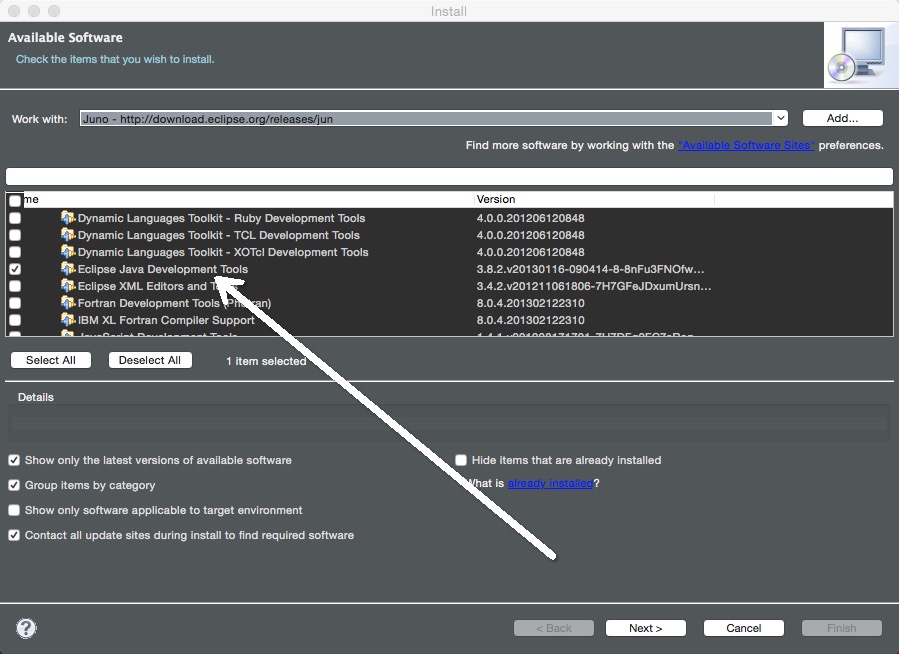
新的ADT里面Java Compiler已经被精简到,可以下载Java Developement Tools
使用
AnroidAninotaions的使用很简单,只需要使用几个自定义注解就可以完成注入
1
2
3
4
5
6
7
8
9
10
11
12
13
14
15
16
17
18
19
20
21
22
23
24
25
26
27
28
29
30
31
32
33
|
@EActivity(R.layout.main)
public class MainActivity extends Activity {
@ViewById(R.id.myInput);
EditText myInput;
@ViewById(R.id.myTextView);
TextView textView;
@AnimationRes
Animation fadIn;
@click
void myButton() {
textView.setText("Hello!");
}
@Background
void background(){
uiThread();
}
@UiThread
void uiThread(){
}
}
|
